For my research project, I decided to investigate World Machine, as I have seen many studios seek out environment artists with knowledge of the software. Unfortunately, due to budgeting, this only goes over the free license version of the software, which limits your export to 1024x1024 and does not support a multi-monitor setup.
Introduction:
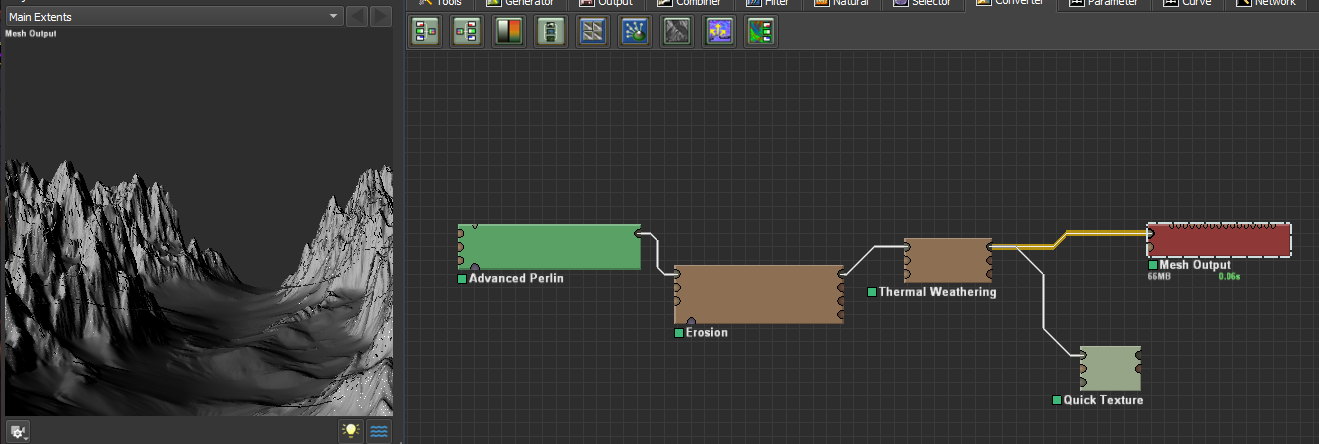
World Machine is a terrain builder that uses procedural noise textures to generate textures and geometry for a landscape. It starts with the Green area, the Terrain Creation tool where you will be building out the basis for the rest of your landscape. This area uses procedural textures and generates normals and geometry that can be modified and pushed through filters, in the Blue area, and then exported as a mesh and map in the Red area.
For me and my portfolio project, I wished to create some simple hills in the background, and then some mountains that frame my building model. I will walk you through the creation of the hills, the tools within World Machine that I used, and the process of exporting the landscape for use in Unreal Engine 4.
Part One - Terrain Creation
When you double click the Advance Perlin Node, you will be given the following options. You can start with a preset, which ranges from Billowy Hills to Sharp Mountain Ranges. Some experimental options are also given that you can blend together to create more unique landscapes. You can adjust the scale of the range here, so you can have a large range of mountains or just a few on an island. The persistence controls the persistence of the selected fractal. The seed allow you to randomize your landscape until you find one that fits. The steepness increases the highest and lowest values to create steeper hills or mountains. The Middle elevation allows you to control the overall sealevel.
Next you may choose to go through another generator. There is the Radial Gradient generator that helps build a single radial hill or mountain. You can adjust the radius and the blur around the edges of the hill/mountain.
Another generator that you can run your landscape through is the shape generator. This allows you to to have control of shapes on your landscape, or even create custom shaped islands or ranges!

Last, you could run it through a Voronai fractal to get more abstract shapes in your landscape.
Part Two: Filters
Now that you have the basic shape of your landscape created, you may want to run it through some filters. You can terrace your landscape or add erosion to make the landscape feel more weathered.
First you can terrace the landscape by double clicking the terrace node.
Then you can run your landscape through an erosion filter to mimic the idea of the landscape being affected by years of rain and other weather conditions.
Part Three: Exporting your Project for UE4.
Next you may want to generate some simple textures and normals for your landscape for UE4. if you pull of from your final node, make sure the first one goes into a mesh output. Then, you can create a basic coverage and select the colors for your landscape. You will need to add a Bitmap Output so World Machine knows to generate a map. You must do the same with your normal map.
I fyou would like to import the landscape to your project as a landscape, you can go to Landscape Mode > New Landscape > Import from file, then select your heighmap file which was generated from your height output. Then , create a material with both your basic coverage and normal maps.
Then press Import! Voila!
Alternatively, if you would like to export your mesh as a model that you can bring into Maya and Zbrush, set an output to a Mesh Output.
This will give you an OBJ export which can be used to create a static mesh asset, and can be modified within ZBrush!


